

The pump may not be the problem. When dosing changes or stops, troubleshooting Pulsafeeder pumps should start with the complete dosing system. A changed control signal, interrupted chemical supply, or process condition can produce symptoms that look like pump failure. Replacing parts before isolating the cause can add downtime without resolving the issue.
When dosing is uncertain, a symptom-first check can help you identify what to inspect safely, separate pump faults from electrical and control issues, and decide when troubleshooting should stop. Follow the applicable Pulsafeeder manual for model-specific settings and procedures. Isolate power and pressure before maintenance, and follow your site’s chemical-handling and equipment-safety procedures.
This guide covers common symptoms, including failure to prime, reduced or inconsistent output, loss of chemical residual, and unusual noise or vibration. You’ll check the pump alongside the controls, chemical supply, and process conditions, then use the findings to decide whether repair, qualified service, or replacement equipment is the appropriate next step.
Key Takeaways
- Start troubleshooting pulsafeeder pumps by identifying the exact operating symptom. Pump design and chemical service affect the likely causes.
- Follow a consistent diagnostic sequence: check chemical supply, controls, process conditions, and pump response before considering component repair.
- Compare observations with possible causes instead of assuming one symptom points to a single fault.
- Follow site safety procedures, isolate hazards where applicable, and record findings before a reset or repair.
- Base a repair-or-replacement decision on the confirmed fault, equipment condition, and service demands.
Troubleshooting Pulsafeeder Pumps: Start With the Operating Symptom
Start with what the pump is doing, not with a suspected failed part. A no-start condition differs from a pump that runs but delivers no chemical. Both differ from low output, erratic delivery, leakage, or an alarm. Model design and chemical service affect diagnosis, so a check that applies to one pump may not apply to another. For diaphragm models, this Diaphragm pump overview explains the basic operating principle.
A metering pump fault is a symptom that requires system-level diagnosis, not proof that the pump itself has failed. Keep each symptom distinct: no-start points to a different diagnostic path than no-dose; low output differs from fluctuating delivery; leakage and alarms call for particular care and model-specific guidance.
For example, a pump that runs without dosing may have a supply or delivery issue, while a pump that does not start may have a power or control issue. These are possibilities, not diagnoses. Record what you observe before changing settings or attempting a reset. If diagnosis confirms that the pump needs replacement, you can review available metering pump equipment.
What to record before checking a Pulsafeeder pump
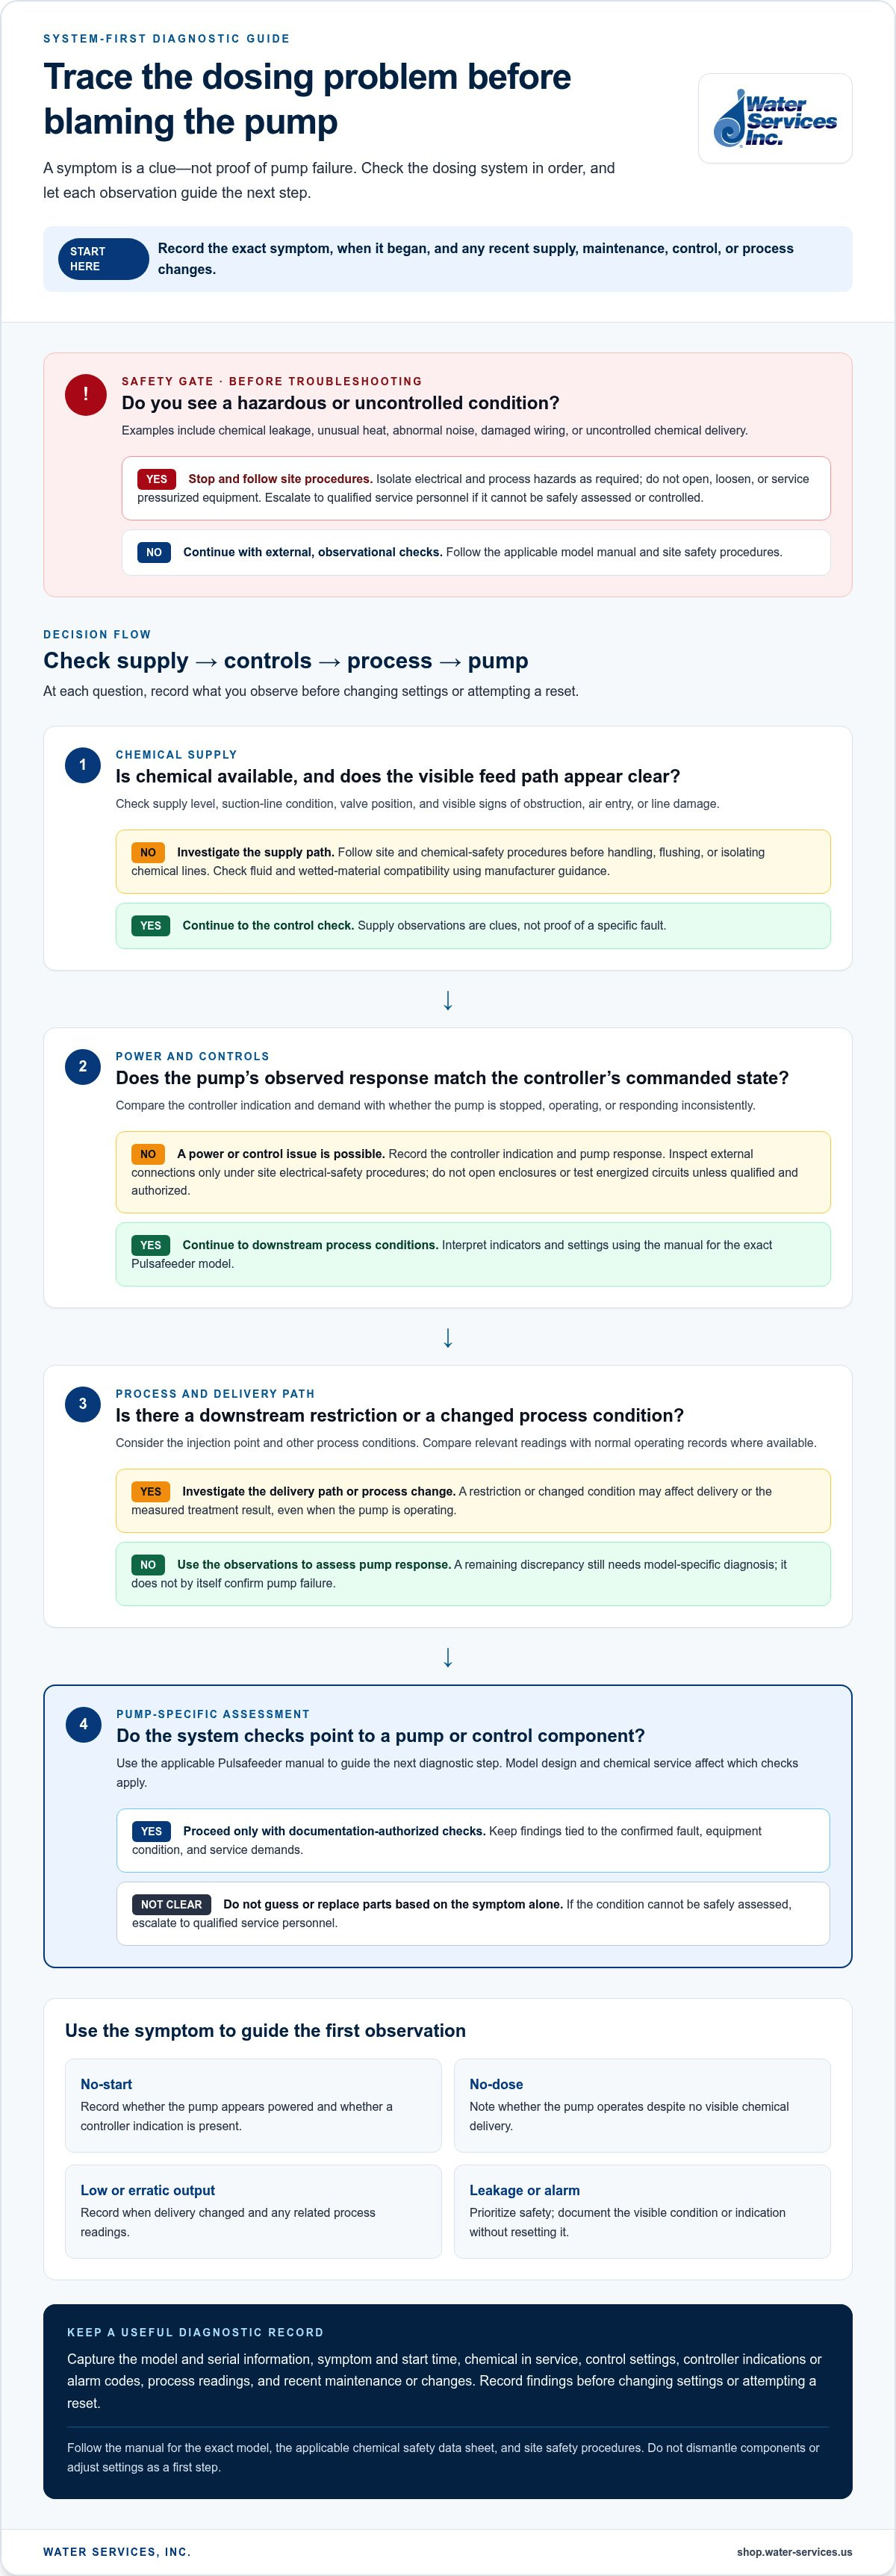
Record the model and serial information from the nameplate, the symptom, and when it began. Note the chemical in service, relevant control settings, controller indications or alarm codes, and process readings. Include recent maintenance, chemical-supply changes, or process adjustments. Capture this information before changing settings. Use the manual for the exact model to interpret codes and settings.
Which symptoms require stopping operation
Stop and follow site procedures if you observe chemical leakage, unusual heat, abnormal noise, damaged wiring, or uncontrolled chemical delivery. Use the applicable chemical safety data sheet and site chemical-handling procedures to determine safe actions. Don’t open, loosen, or service pressurized equipment. Isolate electrical and process hazards according to site requirements, and escalate to qualified service personnel if the condition can’t be safely assessed or controlled.
- No-start: Record whether the pump appears powered and whether a controller indication is present.
- No-dose: Note whether the pump operates despite no visible chemical delivery.
- Low or erratic output: Record when delivery changed and any related process readings.
- Leakage or alarm: Prioritize safety and document the visible condition or displayed indication without resetting it.
How to Diagnose a Pulsafeeder Pump: Check Supply, Controls, and Pump
Work through the dosing system in order: confirm the symptom, check the chemical supply, compare control demand with pump response, then assess the pump itself. This sequence helps distinguish a supply problem or downstream process condition from a pump fault. Confirming chemical supply and control demand can prevent misdiagnosing pump failure.
Keep checks external and observational unless site procedures and the applicable Pulsafeeder manual authorize further work. Don’t dismantle components or adjust settings as a first step. During troubleshooting pulsafeeder pumps, record which observations support or rule out each possible cause before moving on.
Check chemical feed conditions before the pump
Check whether chemical is available and whether the suction line and isolation valves appear clear and correctly positioned. Look for a low or empty supply, visible obstruction, signs of air entry, or a damaged line. Don’t handle, flush, or isolate chemical lines until you’ve followed site procedures and applicable chemical-safety requirements. Confirm fluid and wetted-material compatibility using manufacturer guidance.
Then consider the path beyond the pump. A restriction or changed condition at the injection point or elsewhere in the process may affect delivery or the measured treatment result, even if the pump is operating. Compare relevant process readings with normal operating records where available. Treat these observations as clues, not proof of a specific fault.
Check power, controller demand, and pump response
Review the controller’s commanded state and displayed indications. Compare that demand with the pump’s observed response: is it operating, stopped, or responding inconsistently? A mismatch can point to a control or power issue rather than a mechanical fault. Inspect external connections only under site electrical-safety procedures. Don’t open electrical enclosures or test energized circuits unless you’re qualified and authorized under site rules.
Interpret indicators, settings, and operating checks using the manual for the exact Pulsafeeder model. A display, alarm, or control signal may not mean the same thing across different designs. Record what the controller calls for and what the pump does. Then compare those observations with process measurements to help locate the discrepancy in the dosing loop.
- Supply check: Confirm chemical availability, valve position, and visible line condition.
- Control check: Compare commanded operation with the pump’s observed response.
- Process check: Review downstream conditions and measured readings before assigning the fault to the pump.
If the evidence points to a pump or control component, use the applicable documentation to guide the next diagnostic step. Explore relevant electric power and control equipment when findings indicate a control-side issue.
Pulsafeeder Pump Symptoms Compared: Likely Causes and Diagnostic Clues
Use the symptom to narrow the investigation, not to declare a failed component. During troubleshooting pulsafeeder pumps, pump construction, fluid properties, and installation can all affect which causes are most plausible. The table provides diagnostic leads, not a definitive diagnosis. Confirm next steps against the manual for the exact pump and your site procedures.
| Symptom | Possible causes | Safe observation | Next diagnostic step |
|---|---|---|---|
| No delivery | Interrupted chemical supply, closed isolation valve, line restriction, air entry, absent control demand, or pump fault | Check the supply level, visible line condition, valve position, controller indication, and whether the pump appears to operate | Trace supply and control conditions before assessing the pump using model-specific guidance |
| Low output | Restricted feed path, changed process conditions, incorrect control demand, or reduced pump performance | Compare the current process reading and controller demand with operating records | Check for visible restrictions and review the model manual for permitted output checks |
| Inconsistent delivery | Intermittent supply, air entry, fluctuating control input, or a pump or installation issue | Record when output changes and whether the controller indication changes at the same time | Compare the timing of process readings, control demand, and observed pump response |
| Leakage | A connection, line, or pump-area issue, with the source depending on the installation | Note where fluid is visible without touching or loosening components | Follow site chemical procedures and stop operation if the leak creates a hazard |
| Unusual noise or heat | Possible operating, mounting, supply, or equipment condition requiring assessment | Note when the sound or heat occurs and whether operation or process conditions changed | Stop and escalate if abnormal conditions persist or present a safety concern |
| Unexpected controller behavior or repeated alarms | Control demand, signal, process condition, or a pump-related issue | Record displayed indications and readings without resetting or changing settings | Use the exact model documentation to interpret alarms and define service limits |
Why a Pulsafeeder pump may not dose or may deliver less
No delivery and reduced delivery are different findings. An empty supply or closed valve may explain no dose, while a restriction, changed demand, or pump condition may contribute to low output. Air entry or an intermittent signal can produce variable delivery. Output alone doesn’t identify a failed component. Compare supply, control demand, and process readings before concluding that the pump needs repair. Don’t apply adjustment instructions from another model.
What irregular operation, leakage, or alarms can indicate
Treat noise, visible leakage, unusual heat, and repeated alarms as separate warning signs. Each may point to a system condition rather than a confirmed pump failure. Stop operation when safety is at risk, and don’t open or loosen pressurized equipment. Check alarm meanings and service boundaries in the exact model documentation. Escalate conditions that exceed your site’s safe inspection procedures.
Safe Pulsafeeder Pump Troubleshooting Steps Before Reset or Repair
Pause before resetting, adjusting, or opening equipment. A controlled sequence protects personnel and preserves useful diagnostic evidence. Follow site lockout/tagout requirements, chemical-handling procedures, and pressure-isolation steps where applicable. Never bypass an interlock, open energized equipment, or change settings that haven’t been verified for the specific pump and control configuration.
- Stop: If there’s an uncontrolled chemical release, damaged electrical component, or pressure-related hazard, stop work and follow the site’s emergency response procedure.
- Check: Confirm the area and equipment can be assessed safely. Don’t open or loosen pressurized components, and don’t go beyond your authorization or training.
- Document: Record the condition, indications, readings, and checks completed before any reset or adjustment. This preserves useful fault information.
- Escalate: Refer persistent alarms, unresolved faults, or issues requiring internal pump access to authorized maintenance or qualified service personnel.
When not to continue troubleshooting
Stop if a chemical release can’t be controlled safely, electrical components appear damaged, or pressure creates a hazard. Don’t keep restarting equipment to see whether a fault clears. Persistent alarms and problems requiring internal pump access call for escalation under authorized site maintenance procedures. Use the site emergency response process for immediate hazards, and keep personnel clear of unsafe equipment.
What diagnostic information helps service resolve the issue
Provide the pump model and serial information, a timeline of the symptom, the fluid in service, and relevant operating or process readings. Include controller indications, recent maintenance, process changes, and checks already completed. Record what happened without changing settings just to produce a different reading.
Use the manual for the exact Pulsafeeder model to interpret indications and identify appropriate service boundaries. Consult the applicable chemical safety data sheet and site procedures before handling or isolating chemical lines. If findings point toward the control side, review relevant industrial electric power controls as part of the diagnostic process.
Clear records make the next step more precise. Share observations and documentation with authorized maintenance or technical support instead of attempting work outside site safety controls.
Repair or Replace a Pulsafeeder Pump: Decide From the Diagnosis
Choose repair or replacement only after locating the fault. A dosing problem may come from the pump, controls, chemical supply, or process conditions, and replacing the pump won’t resolve an issue elsewhere in the system. When troubleshooting pulsafeeder pumps, weigh the confirmed fault alongside equipment condition, required dosing service, and the operational impact of downtime.
When repair may be the practical next step
Repair may be appropriate when diagnosis identifies a specific serviceable fault and the applicable manufacturer guidance supports corrective work. Assess whether the pump’s overall condition is acceptable and whether it remains suitable for the fluid and dosing duty. Confirm the model and serial information before identifying parts. Don’t assume a component is compatible because it looks similar or comes from a related pump model. Verify parts and procedures against the correct documentation.
Consider the effect of repair on process needs. A targeted repair may address a defined fault, but it shouldn’t be treated as a confirmed solution until the pump’s response can be assessed under relevant operating conditions. Internal work must follow site safety requirements and the manufacturer’s instructions.
When replacement or system review deserves consideration
Consider replacement if the diagnosis indicates that the pump’s condition or suitability doesn’t meet the application’s demands. Account for the required dosing service and the operational consequences of continued downtime. Replacement shouldn’t be the default response to a symptom alone.
Before selecting replacement equipment, review the full dosing path. A control demand that doesn’t match the pump response, a restricted supply line, unsuitable fluid conditions, or a downstream process change may remain unresolved if attention stays on the pump alone. If fluid selection or dosing context appears relevant, include it in the system decision rather than treating the issue as a pump-only fault.
- Repair: Consider it when a specific serviceable fault is identified and the pump remains suitable for its duty.
- Replace: Consider it when the diagnosis points to equipment condition or application suitability, not simply because dosing has changed.
- Review the system: Recheck controls, supply lines, fluid conditions, and process readings before committing to either option.
Once diagnosis supports pump replacement, review available Pulsafeeder and other pump equipment against the application and verified requirements. Use the applicable model documentation for specifications and compatibility, and tie the decision to the confirmed cause.
Make the Next Pump Decision With Confidence
Effective troubleshooting pulsafeeder pumps starts with the observed symptom, then checks the chemical supply, controls, pump response, and process conditions. No-dose, low output, erratic delivery, leaks, and alarms each provide different diagnostic clues. Use the applicable model manual for settings and service guidance.
Keep safety central. Follow site procedures before any reset or repair, and stop when a condition creates a chemical, electrical, or pressure hazard. Base repair or replacement on the confirmed fault, equipment condition, and dosing requirements, not on a symptom alone.
Water Services, Inc. supplies Pulsafeeder metering pumps and provides technical support and maintenance for industrial water-treatment applications. If diagnosis points toward replacement, browse pump equipment and match your selection to the application and verified requirements.
Frequently Asked Questions
Why is my Pulsafeeder pump running but not dosing chemical?
A running pump may fail to deliver chemical because of an interrupted supply, air in the pump head, a suction-line leak, or valves that aren’t sealing properly. Check the tank level, visible suction-line condition, and valve positions without dismantling equipment. Compare controller demand with pump response, and consider restrictions or changed process conditions downstream. These are diagnostic leads, not a confirmed fault. Consult the manual for your exact model before service.
What causes a Pulsafeeder pump to lose prime?
A pump may lose prime if air enters the suction line, the chemical supply runs low, or pump-head valves don’t seal effectively. Inspect the supply level, visible line connections, and valve positions for obvious issues. Don’t loosen fittings or open the pump head while the system is pressurized. Follow site chemical-handling procedures and the applicable Pulsafeeder manual for any priming or air-bleeding procedure, since steps vary by pump model.
How do I troubleshoot a Pulsafeeder pump with low output?
Compare observed output with controller demand and relevant process readings. Check for a low chemical supply, visible line restrictions, closed isolation valves, or changes in process conditions. A low reading alone doesn’t identify a failed pump component. Record your observations, then consult the correct model manual for permitted checks and settings. Don’t adjust the pump using instructions for a different model.
Can a controller or power issue make a Pulsafeeder pump stop dosing?
Yes. A missing power supply, interrupted control signal, or changed controller demand can stop or alter dosing even if the pump itself is functional. Compare the controller’s displayed state with the pump’s observed response, and note any alarms or process readings. Inspect external connections only under site electrical-safety procedures. Don’t open energized equipment or bypass interlocks. Use the applicable controller and pump documentation to guide further checks.
What should I do if a Pulsafeeder pump is leaking?
Prioritize safety. If chemical is escaping, follow site emergency and chemical-handling procedures, using the applicable safety data sheet to guide the response. Stop operation when the leak creates a hazard, and don’t touch the fluid or open, loosen, or service pressurized equipment. Record the leak’s visible location from a safe position and escalate to authorized maintenance or qualified service personnel. Internal inspection or repair should follow site requirements and the exact model documentation.
When should I repair or replace a Pulsafeeder metering pump?
Consider repair when diagnosis identifies a specific serviceable fault and manufacturer guidance supports the work. Consider replacement when the pump’s condition or suitability no longer meets the application’s dosing demands. Before deciding, confirm the fault location and review controls, chemical supply, fluid compatibility, and process conditions. Verify parts and equipment specifications against the exact model documentation. Replacement is a considered decision, not the default response to a change in dosing.
0 comments